


There’s a systematic eight-step approach you can follow to select, size, and install a surge protection device to safeguard your sensitive equipment. You’ll assess risk, choose the right SPD type and location, verify system grounding and bonding, install per manufacturer and code, coordinate with upstream protection, test functionality, and schedule routine inspections to maintain protection and uptime.
Key Takeaways:
- Assess the electrical system and select an SPD with the correct type, voltage rating (MCOV), and surge current capacity for the equipment and service point.
- Place SPDs at the service entrance and at point-of-use locations as needed; keep conductor and grounding lead lengths as short and direct as possible.
- Bond and ground the SPD to the building grounding electrode system with appropriately sized conductors to minimize ground potential rise.
- Coordinate SPD placement and ratings with upstream/downstream overcurrent protection and follow manufacturer wiring, torque, and mounting instructions.
- Verify operation after installation, label protected circuits, and schedule periodic inspections or replacements based on indicator status and manufacturer guidance.
Understanding Surge Protection Devices
What is a Surge Protection Device (SPD)?
An SPD diverts and limits transient overvoltages away from your equipment by shunting surge energy to ground or a neutral line; response times are typically in nanoseconds and discharge ratings are measured in kiloamperes (kA). You’ll see SPDs specified by clamping voltage and nominal discharge current (e.g., 10 kA, 20 kA). Standards such as UL 1449 and IEC 61643-11 define testing and performance, so you can compare devices by those published ratings.
Types of Surge Protection Devices
You’ll encounter three practical deployment types: Type 1 for service-entrance/surge neutralization, Type 2 for distribution boards protecting branch circuits, and Type 3 for point-of-use protection at sensitive loads. Components include MOVs, GDTs and TVS diodes, each offering different energy absorption and response characteristics; typical installation practice is to layer Type 1→Type 2→Type 3 for coordinated protection.
- Type 1: installed ahead of the main overcurrent device for direct lightning currents.
- Type 2: installed at distribution panels to handle switching and indirect strikes.
- Type 3: installed at the equipment or outlet for low residual voltage protection.
- Knowing you should choose ratings (In, Imax, Uc) that match system short-circuit and exposure levels.
| Type 1 | Service-entrance SPD; handles high-energy transients from direct or near strikes. |
| Type 2 | Distribution-board SPD; common ratings 10-40 kA In; coordinates with upstream units. |
| Type 3 | Point-of-use SPD; low let-through voltage for sensitive electronics at outlets. |
| MOV (Metal Oxide Varistor) | Widely used energy-absorbing element; degrades with repeated surges-check lifespan. |
| GDT / TVS | GDTs handle high surge currents; TVS diodes give sub-nanosecond clamping for fast transients. |
You should coordinate SPDs so upstream devices carry the bulk of energy while downstream units limit residual voltage; for example, a data center often uses a Type 1 at service with a 40 kA rating, Type 2 at distribution with 20 kA, and Type 3 at racks to keep equipment below sensitive clamping thresholds. You’ll also verify short-circuit withstand and enclosure grounding to ensure the SPD operates safely under fault conditions.
- Match SPD nominal discharge current to site exposure: 10 kA for light exposure, 20-40 kA for higher risk zones.
- Choose low Uc (maximum continuous operating voltage) to reduce let-through to equipment.
- Factor in coordination: upstream devices absorb bulk energy, downstream devices protect residual-sensitive loads.
- Knowing inspection intervals and replacement after significant surges preserve your protection strategy.
| Application | Recommended SPD Type and typical rating |
| Service entrance (commercial) | Type 1, 40 kA+ Imax for high-energy exposure |
| Main distribution boards | Type 2, 10-40 kA In depending on fault level |
| Equipment rack/outlet | Type 3, low Uc point-of-use SPD |
| Telecom/data lines | Line-specific SPDs (GDT/TVS) with fast response and low clamping |
Assessing Your Equipment’s Needs
You should inventory devices by function, voltage (120/240V, 277/480V), replacement cost and downtime impact, noting servers, control panels, medical gear and sensitive instrumentation. Check equipment manuals for transient immunity and maximum continuous operating voltage (Uc). Also evaluate site factors: lightning strike density, service entrance fault current, and whether you need cascade protection at service, distribution and point-of-use to meet uptime targets and insurance or compliance requirements.
Identifying Sensitive Equipment
Identify gear with microelectronics, firmware or precision sensors: servers, NAS, medical imagers, PLCs, lab analyzers and telecom racks. You should flag items where a single transient causes data loss or calibration drift; for example, a rack server replacement plus restoration can exceed $5,000 and several hours of downtime. Mark critical loads for prioritized point-of-use protection and backed-up power.
Determining Protection Levels Required
Match SPD type and ratings to your system: Type 1 for service entrance, Type 2 for distribution panels, Type 3 for point-of-use. Select nominal discharge current (In) in the 5-40 kA range based on lightning exposure and service size, ensure maximum continuous operating voltage Uc meets system voltage, and target a low let‑through voltage (Up) compatible with your equipment’s surge withstand.
For more precision, measure available short‑circuit current and local surge incidence: areas with high lightning density typically justify In of 20-40 kA at the service, while low‑risk sites may use 5-10 kA SPDs. Coordinate cascade protection-higher‑energy SPDs upstream and low‑Up devices at racks-and verify device specs (Uc ≥ system voltage, Up below equipment immunity). Document selections with supplier datasheets and a simple bill of materials for installers.
Choosing the Right Surge Protection Device
Factors to Consider
Check your service type (single- or three-phase), system voltage and the SPD’s clamping (let-through) voltage, response time and energy absorption (joules or kA). Match Type 1/2/3 placement to service entrance, distribution panel and point-of-use, verify UL 1449 4th edition compliance, and ensure your grounding and breaker coordination support the device. After you compare these specs against your equipment tolerance, select the unit that fits both electrical and environmental conditions.
- You should target a low clamping voltage (≤400V is ideal for sensitive electronics).
- Look for energy ratings: point-of-use typically 1,000-6,000 J; service-panel devices specified in kA surge capacity.
- Check response time (nanoseconds or faster) and MOV or hybrid technology details.
- Confirm UL/IEC certifications, warranty terms and connected-equipment coverage.
- Ensure compatibility with your panel’s short-circuit rating and grounding system.
Recommended Brands and Models
You’ll often choose APC SurgeArrest for point-of-use protection, Tripp Lite Isobar for rugged rack or shop environments, and Eaton, Leviton or Schneider Electric/Square D for panel-mounted, whole-home or commercial Type 2 SPDs; each brand offers models with different joule/kA ratings and warranties suited to specific use cases.
For mission-critical gear, pair a service-entrance Type 2 SPD (aim for ≥20 kA surge capacity) with point-of-use units rated >2,000 J; APC’s SurgeArrest series provides EMI/RFI filtering for offices, Tripp Lite Isobar adds metal housings and isolated filters for noisy environments, and Eaton/Leviton panel modules integrate with breakers to simplify coordination-always verify the manufacturer’s installation requirements to maintain warranty and connected-equipment guarantees.
Planning Your Installation
You should map the electrical distribution, identify the service or subpanel to protect, and pick an SPD type (Type 1/2/3) that matches that location. Account for expected surge exposure-common Imax ratings range from 20-100 kA per mode-and coordinate upstream overcurrent devices so the SPD can operate without nuisance tripping. Factor conductor routing to minimize lead length (shorter is better), verify available fault current, and budget for a qualified electrician and any required enclosure or ventilation.
Location Selection
Place the SPD as close as possible to the distribution point you’re protecting-many manufacturers recommend within 3 feet (≈1 m) of the panel for whole-building protection-and mount it on a stable, vibration-free surface away from heat sources. Provide at least 1-2 inches clearance for airflow and cable access, avoid damp or corrosive environments unless using a rated enclosure, and locate the grounding conductor route so you can keep bonding runs short and direct.
Safety Precautions
You must de-energize the circuit and implement lockout/tagout before touching bus work, use a calibrated voltage tester to confirm zero volts, and wear PPE appropriate to the available fault current per NFPA 70E-insulated gloves, eye protection, and arc-rated garments when exposure requires it. Use insulated tools, keep hands clear of energized conductors, and have a trained colleague nearby when working on live systems only if absolutely necessary.
Before you begin, follow a written safety checklist: verify isolation at the service disconnect, test and document zero energy state on all phases, and confirm the grounding electrode system is intact (sites commonly aim for ≤5 Ω). Torque all SPD terminations to the manufacturer’s spec using a calibrated torque wrench-many terminal specs fall between 20-40 in‑lb-label the SPD and update single‑line diagrams, then perform a post‑installation insulation and function test.
Step-by-Step Installation Process
Quick Install Overview
| Step | Action & details |
| 1. Isolate supply | Switch off and lock the main breaker; verify zero voltage at the panel with a rated tester. |
| 2. Location | Mount the SPD on the DIN rail inside the main distribution board, within 1 m of the service origin for optimal performance. |
| 3. Conductor routing | Keep live and earth leads as short and straight as possible (typically ≤10 cm / 4 in); use ferrules on conductors. |
| 4. Connections | Wire phases and neutral to SPD terminals per polarity; bond the SPD earth to the main earthing bar with suitably sized conductor (commonly 4-6 mm² per local code). |
| 5. Torque & protection | Tighten terminals to manufacturer torque (often ~2.5-3.5 Nm); install required upstream overcurrent device if specified by the SPD datasheet. |
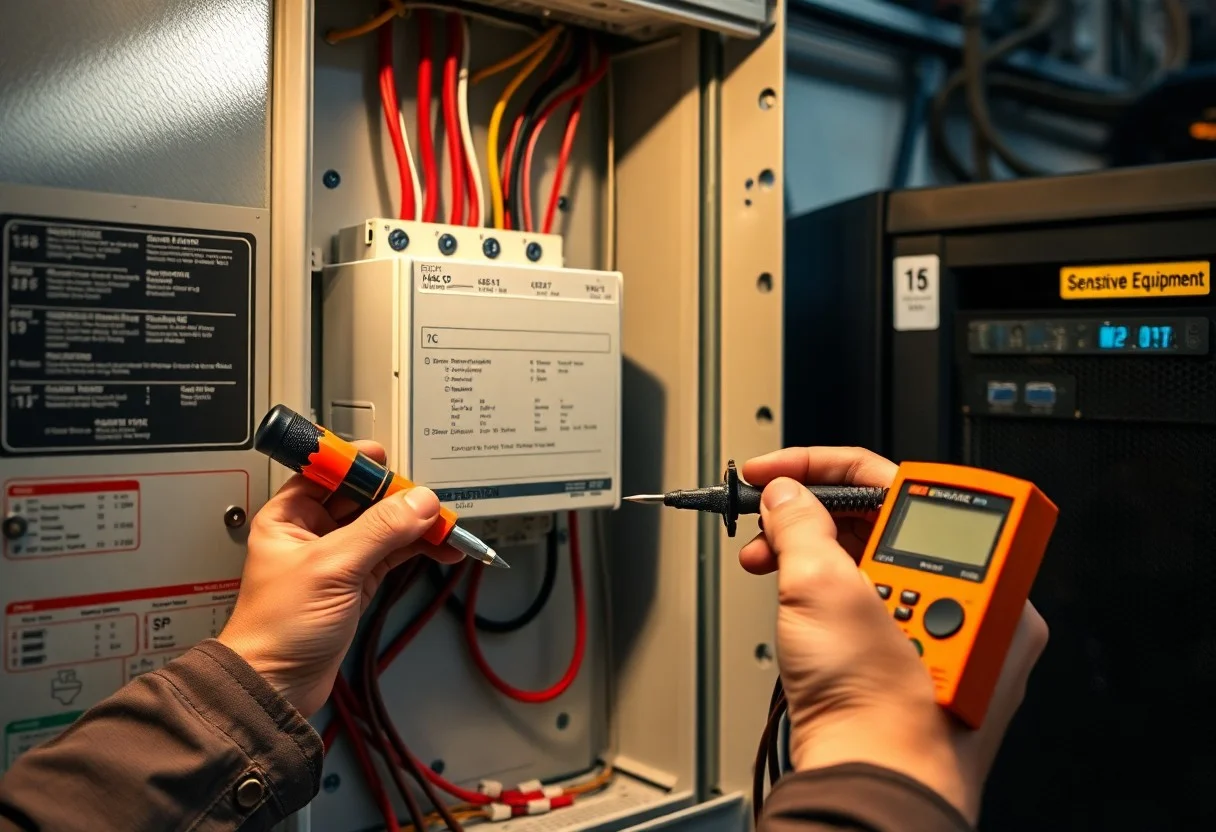
| 6. Verification | Measure earth continuity (<1 Ω desirable); check SPD indicator/remote trip contact; consult the product manual or The Surge Protection Device (SPD) for model-specific tests. |
| 7. Labeling & documentation | Mark the panel with SPD type, installation date, nominal discharge current (Iimp) and replace-by date based on service history. |
Tools Required
You need a calibrated voltage tester and multimeter, a torque screwdriver (2.5-3.5 Nm range), insulated screwdrivers, wire strippers and ferrule crimper, a length of appropriately sized earth conductor (4-6 mm² typical), cable ties, and personal protective equipment-gloves and arc-rated eye protection-so you can work to safe, repeatable standards and meet manufacturer specs.
Installation Instructions
After isolating the supply, mount the SPD on the DIN rail near the main incoming terminals, route phase and neutral conductors with minimal length (≤10 cm), attach the earth conductor to the main earthing bar, torque terminals to the manufacturer’s value, then re-energize and verify the SPD indicator and earth continuity; for 3-phase systems use a 3+N device, for single-phase use 1+N.
In practice, you should follow a checklist: confirm panel voltage class, choose the correct SPD type (Type 2/Type 3 or 3+N), and fit any required upstream fuse or switch. Use ferrules on all stripped ends and keep parallel conductors close to reduce loop inductance. After tightening to specified torque, test insulation and earth resistance-aim for continuity under 1 Ω between SPD earth and panel earth. Log Iimp (kA) and nominal discharge specs from the SPD nameplate, note the installation date, and schedule periodic inspections; in commercial installs track cumulative surge events if the SPD includes a counter or remote alarm.

Testing and Maintenance
Testing Your Surge Protection Device
You should verify SPD function by checking the indicator LED and grounding continuity monthly; standards like UL 1449 and IEC 61643‑11 define acceptable limits. Use a clamp meter to check leakage current and, when available, an oscilloscope with a surge generator to confirm VPR/clamping voltage and response time (typically low nanoseconds). If indicators are off or measured clamping voltage exceeds the spec, take the SPD out of service and follow the manufacturer’s replacement procedure.
Regular Maintenance Tips
You must perform visual and electrical inspections: monthly visual checks for discoloration, burn marks, or tripped flags; annual full tests including infrared thermography, terminal-tightening to the manufacturer’s torque, and event-log review. MOV-based SPDs degrade with cumulative energy-manufacturers often advise replacement every 3-5 years or sooner after significant surge exposure based on recorded events and site history.
- Monthly: verify status LED, ground continuity, and cabinet integrity.
- Annually: perform infrared scan, tighten terminals to manufacturer’s torque, and test functionality with a qualified electrician.
- After storms: review SPD event log or inspect for evidence of clamping activity.
- Any damaged SPD should be removed and replaced to protect sensitive loads.
You should keep a service log recording SPD model, installation date, measured VPR, surge-count or event-log downloads, and photos; in one commercial installation engineers avoided downtime by replacing three SPDs after logs showed repeated high-energy events. Have a licensed electrician carry out annual end-to-end verification and archive thermal images and torque records to spot gradual degradation before failure.
- Keep a serial-numbered log with date, test values, and photographs.
- Use infrared thermography and event-log downloads during annual inspections.
- Schedule replacement based on manufacturer life expectancy or after a recorded high-energy surge.
- Any replacement action should follow the original system coordination plan and be documented.
To wrap up
Presently you can consolidate the eight key steps into a practical checklist: assess system needs and transient risk, select an SPD with appropriate voltage and energy ratings, plan optimal placement, ensure proper bonding and grounding, use correct conductor sizing and connections, install coordinated upstream/downstream protection, test and commission the device, and establish routine inspection and maintenance so your sensitive equipment remains protected and your electrical system performs reliably.
FAQ
Q: What are the 8 key steps for installing a surge protection device (SPD) that shields sensitive equipment?
A: 1) Assess the facility’s power system, load sensitivities, and surge exposure; 2) Select the correct SPD type and ratings for service, distribution, and point-of-use; 3) Design a cascade/placement strategy (service entrance, subpanels, point-of-use); 4) Verify and prepare grounding and bonding to achieve low impedance paths; 5) De-energize and isolate circuits, following lockout/tagout and safety procedures; 6) Mount the SPD close to the protected equipment or panel and make shortest possible connections; 7) Commission and test the installation (phase orientation, continuity, indicator/alarm function, surge counter); 8) Document installation, schedule periodic inspections, and plan replacement or maintenance after events or at end-of-life.
Q: How do I choose the right SPD type, voltage ratings, and performance specs for sensitive equipment?
A: Match SPD class/type to the application (service entrance Type 1/Type 2 for building mains, Type 3 for point-of-use protection), confirm compatibility with single- or three-phase systems, and select ratings: maximum continuous operating voltage (Uc/MCOV) at or above system nominal voltage, nominal discharge current (In) consistent with expected surge exposure, and low voltage protection level (Up) that keeps residual voltage below the equipment’s withstand level. Use devices certified to relevant standards (UL 1449, IEC 61643), check response time, peak surge current rating (Imax), and features like thermal/fault disconnects and remote alarm contacts for monitoring.
Q: What grounding and bonding practices ensure the SPD will protect sensitive equipment effectively?
A: Provide a direct, low-impedance connection from the SPD’s ground terminal to the facility grounding electrode or main equipment grounding conductor using the shortest, straightest heavy-gauge copper conductor practical. Bond the SPD chassis to the building equipotential grounding system so enclosures and nearby equipment share the same reference. Avoid long loops or routing through conduit that increases inductance. Follow local code torque values for connectors, separate communications/data shields as required, and ensure bonding continuity across subpanels to prevent step and touch voltages during large surges.
Q: How should SPDs be coordinated across service entrance, distribution panels, and point-of-use protection to shield sensitive loads?
A: Implement a cascaded strategy: install a high-capacity SPD at the service entrance to handle bulk energy, medium-capacity devices at distribution panels to reduce residual voltage, and fast-response, low-Up point-of-use SPDs for sensitive equipment. Ensure upstream devices have higher or equal surge current capacity and compatible clamping characteristics so energy is attenuated progressively. Use coordination guidance from manufacturers and standards, select appropriate series or parallel ratings, and place devices as close as possible to the equipment they protect to minimize lead length and inductance.
Q: What testing, commissioning, and maintenance steps confirm the SPD is working and will continue protecting sensitive equipment?
A: Before energizing, verify wiring, polarity, mounting, and grounding continuity. After installation, confirm the SPD indicator(s) or remote alarm operate and read surge counters where fitted. Measure line-to-ground and line-to-line voltages to ensure proper operation. Schedule regular inspections to check status indicators, connection torque, signs of thermal stress, and surge counter increments after storms. Replace SPDs after a major surge event, when end-of-life or failure indicators are shown, or per manufacturer service life guidance, and keep installation and maintenance records for warranty and compliance with codes such as the NEC.
Tagged Installation, Protection, Surge